As
I was doing the laundry last week, I noticed that our family’s
white shirts look pretty bad. They are not bright, white, and crisp.
They are more dingy, greyish, and limp.
The
breast pockets of some have a funny black outline, and there is an
odd grey something collected in the seams. There are stray marks on
cuffs and collars — ink, maybe, but how would ink get on a
collar? There is definitely ring around the collar. Also, the shirts
don’t look crisp anymore. The collars and stitching are limp
and lumpy.
How
can I get them white and crisp again? I can’t just go out and
replace all of these shirts.
Answer:
This
column will be for people who have more time than money.
If
you have more money than time, I suggest you throw away the shirts
and replace them. Everything has a life, and once a white shirt turns
yellow or grey with stains and a lumpy collar, it’s time to
replace it.
Yes,
I’ve heard of waste not, want not. But it’s not wasteful
to discard an item whose usefulness has been exhausted, especially
when the value of that item is very low. Indeed, spending hours
trying to make it new again would be a complete waste of time if you
don’t have much time to spare.
However,
if you have a spare day, there is a lot you can do to make your white
shirts white again. And if your family is going to continue wearing
them, you absolutely want them to look sharp. A crisp white shirt is
a joy to everyone who beholds it.
First,
you’ll need some tools.
OxiClean
Hot water
A deep sink or big bucket or both
A bleach pen
Nylon brushes, like you’d use on grout
Strong laundry detergent
A good steam iron
Ironing board with well-padded cover
Starch
Get
your water running until it is nice and hot. While it is heating up,
scrub the sink and/or bucket. Then, fill them with hot water. As the
water is running in, add about a half scoop of OxiClean for each
gallon of water. Don’t fill them too high, or the water will
slosh out when you add the shirts. Use a wooden spoon to help the
OxiClean dissolve.
While
the sink is filling with water, inspect each shirt. Remove anything
from the breast pockets, undo all buttons, note any stains or
discoloration, and check for tears. After you have inspected a shirt,
plunge it into the soapy water. You might want to use the wooden
spoon again so you don’t scald your arms. Get
all of your shirts soaking and use the spoon to make sure all cuffs,
collars, and underarms are totally submerged. Then, leave them until
the water has cooled enough for you to put your hands in without
hurting yourself.
Once
the water is tolerable, retrieve the dirtiest shirt. Using your hands
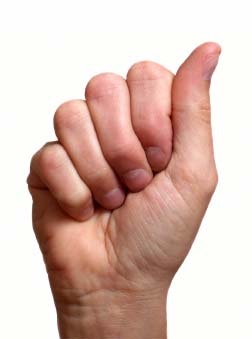
and the nylon brush, scrub the shirt. To wash by hand, grasp the
soapy shirt in both hands, which should each be making the shape of a
sign language “A.” The hands should be about four inches
apart on the fabric.
Sign language “A,” which is basically a fist with the thumb pointed upward and outward.
Hold
one hand still with the folded fingers facing up. Then rub the other
hand, with its folded fingers facing down, across the first hand. The
fabric between the hands will agitate against itself, removing dirt
and stains. (This motion is also an excellent way to get white
deodorant marks off a knit top, but you do it dry, without water.)
As
you scrub, periodically dunk your hands, still grasping the shirt, in
the water for some more suds. Once you have scrubbed a part of the
shirt to your satisfaction, move your hands down the fabric three or
four inches and repeat the process.
On
particularly soiled areas, such as the collar, cuffs, and underarms,
use a brush. Put the part of the shirt you wish to wash on a flat
surface, such as the center divider or side of your sink (I am
assuming you don’t have a washboard), and use short strokes
away from your body. Dip your brush into the suds frequently. Since
you are going to put the shirt in your washing machine after the
OxiClean soak, you probably don’t need to use a scrub brush on
the whole shirt.
You
may be interested to know that vast swaths of the world’s
people scrub their clothes with brushes. The result, when combined
with good soap or detergent, is extremely clean clothing (as long as
you have a way to prevent discoloration from polluted water).
Your
brush should also be used on the strange gray/black outlines of your
pockets and seams. These outlines are caused by lint that has
collected in the crevices of your shirts. Gently turn the pockets
inside out and brush the lint from the seams. If the button placket
is not stitched down, you may have a lint accumulation there, too.
Also, in the space for collar stays and in the cuffs. Gently turn the
seams inside out and brush out the lint.
If
you have a tiny brush around your house, like an instrument-cleaning
snake or mouthpiece cleaner for a brass instrument, you can use that
to remove lint in tiny spaces, like where collar stays go. Gently
insert the brush wherever you see buildup, then pull it out. Rinse
the brush and repeat until you can’t remove any more lint
without damaging the shirt.
If
the shirt has stains or is smelly in the underarms, use the brush and
lots of suds to loosen the dirt. If you have a severe buildup of
deodorant or antiperspirant, you will need to soak the shirts
overnight in clean, hot, soapy water and scrub them again tomorrow.
Then, spray them with Shout or similar before you put them in the
washing machine.
If
the shirt has other unknown stains, scrub them with the nylon brush.
If they do not respond, use the bleach pen. Apply the bleach; then
rub it in with the brush. Rinse and repeat until the stain responds.
If the stain does not respond to bleach, let it soak overnight in
clean, soapy water. An unidentified stain that responds to neither
bleach nor OxiClean is almost not worth bothering to remove unless
you have a deep interest in experimenting with laundry products. Just
get a new shirt.
Once
you have completed this process, put the shirt back in the sink or
bucket and move on to the next one.
After
all the shirts have been hand treated, drain the water and put them
directly into your washing machine. Don’t rinse them. Take a
moment to reflect with awe on how dirty the water is. You have
accomplished something!
Now,
wash them on warm with as long a soak as your washer will do. Use the
washer’s setting for whites, and make sure it includes an extra
rinse, also with warm water. Use the maximum recommended dose of
detergent.
Once
the washer is done, inspect each shirt before putting it in the
dryer. They should be looking pretty good by now. Dry them on medium
and then hang them up on proper shirt hangars, the kind that have the
shape of a collar at the top. Hang them straight.
The
creases in the sleeves should line up with the hanger as it
transverses the yoke (that’s the part of the shirt that goes on
top of your shoulders).
Now,
set up your ironing board. Put it somewhere that children cannot
knock it over, and where your clean shirts will not drag on a dirty
floor or be stepped on by any kind of creature. If you are
right-handed, the pointy end of the board should be on the left, and
the iron should be plugged in to your right.
If
you are not a veteran ironer, don’t plan on watching TV while
you iron. You need to look at what you are doing. I will allow an
audiobook, of course. The whole point of ironing is to listen
uninterrupted to audiobooks.
Fill
your iron with water and plug it in. Turn it up to hot and turn on
the steam. Let a few good bursts of steam course through the iron to
make sure there is no build-up inside that will soil your clean
shirts.
Get
your starch. Take down the sorriest looking shirt and iron it. For
each part you iron, put it on the board, smooth it out, and spray
some starch. Let the starch settle into the fabric for a few seconds
before you apply the iron. Don’t use too much starch, or you
will get little grey flakes of it all over the shirt.
Here
is the order in which to iron the parts of a man’s shirt:
Collar:
Lay it flat and iron the wrong side, then the right side. Work from
the points of the collar towards the middle. Especially in an older
shirt, this will prevent that funny little extraneous fold of fabric
from appearing at the edge of the collar. Leave the collar flat
until you are done with the whole shirt.
Yoke:
Flatten it on the ironing board, fold any pleats to their proper
position, and work from the outside in (again, to keep seams
smooth); pull it almost taut as you work
Button-side
placket: Wrong side, then right side, ironing between the buttons.
Note: As you iron the front and back of the shirt, the collar should
stay to your left and the body of the shirt to your right.
Right
sleeve, front and back; then left sleeve, front and back. Straighten
and flatten each sleeve’s seam, pleats, and cuff before you
iron it. Start ironing at the seam, then move up.
Buttonhole-side
placket: Wrong side, then right side
Button-side
placket again: Wrong side, then right side
Right
side front of shirt, from collar to hem; rotate the shirt around the
ironing board as needed.
Back
of shirt, moving from the right side to the left, taking care to
properly iron any pleats.
Left
side front of shirt
Buttonhole-side
placket
When
the shirt has been ironed, fold the collar by hand. Ironing down the
folded collar only wears it out sooner. Then, hang the shirt with the
hangar in the creases of the yoke. Fasten the second button from the
top and hang it where it will not be disturbed. Let it cool before
you put it in the closet. It will re-wrinkle most easily when it is
hot.
Note
that shirts with a high polyester content will not be as crisp as
shirts with a high cotton content; also, they are much harder to
whiten as they age. I prefer shirts that are 100% cotton.
Your
shirts must look amazing! Admire them! If they don’t look
amazing after all this, it’s time for new ones. Replace one a
month until the old shirts have all been sent to the great beyond,
not to the Goodwill.
The
next time these shirts walk out your door, reflect with joy and
pleasure on the transformation you have wrought. Look at the white,
pointy collars and ring-free pockets and tell yourself how amazing
they look. Then, when they come home, spray the collars with Shout or
a similar product and wash them in your washer as described above
with a scoop of OxiClean.
Finally,
and most importantly, once you have mastered the art of white shirts,
teach the young wearers of those shirts how to do it themselves.
Do
you have a quandary, conundrum, or sticky situation in your life?
Click this button to drop Cyndie a line, and she’ll be happy to
answer your question in a future column. Any topic is welcome!
Cynthia Munk Swindlehurst spent her childhood in New Hampshire and her
adolescence in San Diego. She served a mission in Manaus Brazil. She
graduated from Brigham Young University with a degree in English and from
Duke University with a law degree.
She practiced law until her first child was born. She enjoys reading, tap
dancing, and discussing current events. She and her husband live in
Greensboro, North Carolina with their two sons.
Cyndie serves as the Sunbeams teacher in her ward.