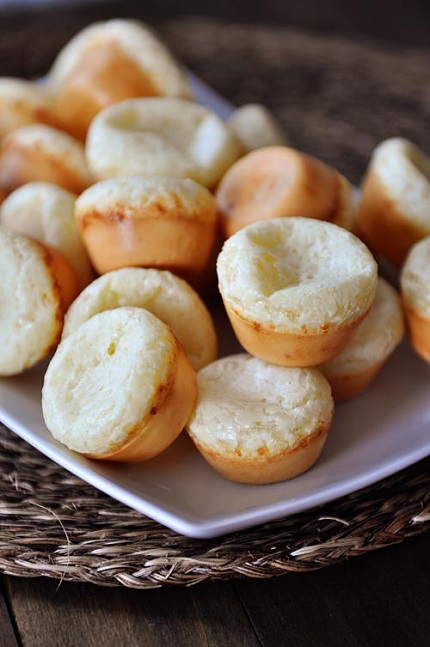
I couldn’t
believe how many of you guessed correctly when I posted a picture of
these babies on Facebook
last week and asked if you knew what they were. I’m so proud,
you little foodies, you. A million dollars to all of you (except for
those that guessed Yorkshire puddings and cream puffs, no offense).
Long live pao de
queijo! Or for all you other non-Portuguese speakers like me,
Brazilian cheese bread. Easy Brazilian cheese bread. Gluten-free,
easy Brazilian cheese bread. Delicious gluten-free, easy Brazilian
cheese bread.
I wasn’t kidding
in my Facebook post that Brian could polish off this entire batch if
left alone. He spent a couple years living in Brazil and doesn’t
want to brag, but would like me to state, for the record, that he
still considers himself (15 years later) a pao de queijo
expert.
Of course Brazilians
don’t necessarily make these in mini muffin tins and there are
a few other differences to the authentic street food of Brian’s
memories, but this quick knockoff recipe definitely fulfills the
cravings and our entire family has been converted to the power and
tastiness of pao de queijo.
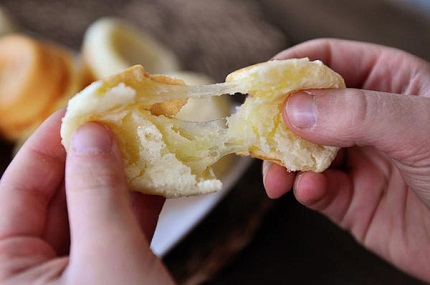
The texture of pao
de queijo is chewy. Chewy, cheesy and delicious. This is due in
part to the cheese used in the very thin batter, but it is also
helped along by the tapioca flour (same thing as tapioca starch).
I’m afraid there
aren’t any substitutions for this ingredient but the good news
is that because tapioca flour is used widely in gluten-free cooking
and baking, I’ve seen it in most grocery stores these days
(we’ve come so far!). I buy mine on Amazon (the Bob’s Red
Mill brand) which works great for us since we make these easy cheesy
little puffs all the time.
If you’ve never
had pao de queijo, methinks now is the time! Get yourself some
tapioca flour, a bit of Parmesan cheese (see the note in the recipe
for other cheese options) and a mini muffin tin and you will be set.
I promise you’ll want to make these over and over again.
Just remember the
Official Pao de Queijo Rules: 1) they must be eaten warm.
must. 2) don’t let them get too brown on the bottom —
they’ll lose their chewiness. 3) you might as well just bite
the bullet and double the batch.
Easy Brazilian Cheese Bread (Pao de Queijo) Yield: Makes 16-24 mini breads
You can experiment with
many different cheeses in this recipe. My favorite combo is Parmesan
and queso fresco (a widely available Mexican cheese). The texture
will change if you use softer cheeses like cheddar or Monterey Jack.
My recommendation if
it's your first time making is to use all Parmesan cheese and then
experiment after that. Don't substitute pre-grated Parmesan in the
green can or even the pre-shredded Parmesan in the bags or tubs (I
tried that and the flavor was artificial and plasticky tasting).
Freshly grated from a block is the way to go.
Also, in case you are
wondering, there isn't a good substitution for the tapioca flour
(same thing as tapioca starch). We make these often enough that I go
through bags and bags of the stuff (I buy it on Amazon — the
Bob's Red Mill brand — or it is usually widely available in
most grocery stores these days).
Ingredients
1 large egg
1/4 cup canola or vegetable or olive oil
2/3 cup milk
1 1/2 cups tapioca flour (fluff the flour before measuring)
3/4 teaspoon salt
1/2 cup packed shredded cheese, like Parmesan or Asiago (see note)
Directions
Preheat the oven to 400 degrees F.
Lightly grease a mini muffin tin (this makes about 16-24 little
breads so if you don't have a muffin tin large enough, you can just
make separate batches after the first ones come out).
In a blender, combine the egg,
oil, milk, flour and salt. Process until the mixture is smooth,
scraping down the sides of the blender once or twice. Add the cheese
and process for just a short bit, 5-10 seconds or a few short
pulses, until the cheese is in small bits all throughout the batter.
Give the batter a good stir to get
any solids off the bottom and pour the mixture into the prepared
muffin tin filling the cups nearly to the top.
Bake the pao de queijo
until very lightly golden brown, 15-20 minutes. Don't let them get
too brown on the bottom or they will be too crusty and not as chewy.
Remove them from the oven and let
them cool for just a minute or two. They are best eaten warm! Don't
worry if the cute little puffs fall a bit in the middle —
that's completely normal.
Recipe
Source: tweaked this
recipe thanks to Brian’s
experience devouring these babies when he lived in Brazil
Melanie Gunnell is a food-loving, chocolate-obsessed mom who has a desperate need to share
her favorite tried-and-true recipes with the world. In a past life she graduated from Brigham
Young University with a degree in public health, but for the past ten years, stay-at-home
motherhood has been her job along with blogging-from-home for the past five.
She resides in the brilliantly cold tundra of Northern Minnesota with her husband and their brood
of five children: four boys and one tiny, bossy girl. Dark chocolate (particularly the act of
shoving chocolate chips in her mouth whilst hiding in the pantry) is her coping skill of choice for
both the never-ending winters and the never-ending wrestling matches in her front room.